Landscaping

Tuesday, January 31, 2012

Kitchen Reveal

To be perfectly honest, we didn't accomplish absolutely everything we set out to. First, my husband got sick. Fun. Then, he gave it to me. Then, my daughter came down with and just as she was getting well, she gave it back to me. If there's one thing our family knows how to do it's share. Unfortunately, the floor isn't finished. It is however, ready for the underlayment and install which should (knock on wood) go reasonably quickly since we're using peel and stick tiles. But in the spirit of the Imagine the Impossibilities Challenge, we did push ourselves and I am so pleased with all that we got accomplished, even if we were passing our germs back and forth during.

TaaaDaaa! Here is our new and lovely kitchen:


We've come such a long way. Here's a little trip down memory lane for you:


Sorry for the blur. The pics were actually taken by our realtor several years ago and the resolution just isn't there. The area to the right of the brick column now houses the refrigerator, but other than that, we kept most of the floor plan the same.


The existing cabinets were really in sad shape, so when Home Depot put their unfinished cabinets on sale for 20% off, we were all over it. We stacked them in one corner and started dismantling the kitchen. The goofy strip my husband is peeling off was a very retro back splash. So glad it's gone now!


 We had the unfinished cabinets in  and most of the counter tops on by late Christmas Eve. Unfortunately, we had the mess you see on the floor and guest coming over the following day for Christmas dinner. Oops?


 Because my husband is a complete perfectionist, he made his own veneer, then glued and clamped it on overnight.


After all that, it was finally time to stain the cabinets, which was my department. We used Rustoleum Cabinet Transformations in Meadow. It was a lot less messy then varnish and looks so much better than regular paint. You can read my review here if you're thinking of using it.


I set up a makeshift paint booth and deglossed everything first, which did a great job of really opening up the grain. The bond coat application went on really easily and quickly. The pictures here make the color look a bit on the minty side, but it's really more of a creamy sage green.


Here's the finished product with hardware, also from Home Depot.


We installed the vent hood and man, it is so nice to have one of those again!


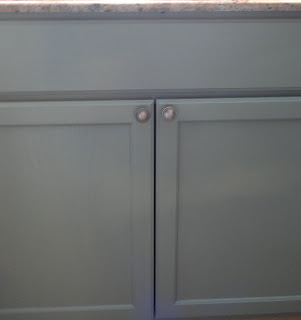
We created a simple and inexpensive back splash out of beadboard. We painted it with Glidden's Blue Grey Slate. I actually got the paint for free when Glidden was doing a FB giveaway, so that made it even better. I'll go through the process of installing the beadboard at a later date, but this post is getting long-winded already :) How about another before&after to wrap thing up?


Ahhh. Ever so much better. Again, I do apologize that the pictures are what they are but unfortunately this is the Pacific Northwest in January and any natural light that manages to filter in is grey and minimal.

Linking with:


Please go check out their projects and leave them some kind words...I'm on my way to do that right now!

Friday, January 27, 2012

Converting a China Hutch to a Bar: The Big Reveal!

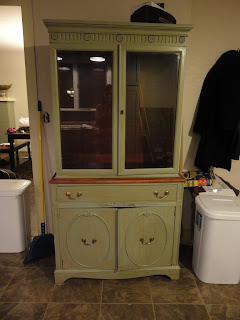
On Wednesday I shared with you some of my ideas and inspiration for converting my grandmother's old hutch to a bar. Well, I decided to go for it! Oh, and I didn't let myself spend any money on it, either. Here's what I started with...


Tons of potential, but a bit too formal for our Craftsman. We wanted something with more of a casual, farmhousey vibe. So, I pulled off the "gingerbread" on the glass doors. It had been cut from a super thin veneer, so it was a snap to just break it and pull it out. I probably wouldn't have the guts to do this with just any piece of furniture, but as I mentioned before, the condition made any "antique" value a moot point. Then, I used the same Meadow color we used on our kitchen cabinets (big reveal on the 31st!!!!!!)


I decided to leave the section in the middle alone for a bit of contrast, too. After 2 coats, this is what it looked like. It came out so much lighter than our cabinets did, which was weird, since I thought that painting over a darker wood color would make the paint appear darker, but hey, live and learn.


One part of the Rustoleum kit we hadn't used was the glaze. And since I'd never glazed anything before, I was itching to try it. It went on super dark and I definitely had that -uh oh, what have I done- moment:


You just paint the glaze on there with a brush, wait until it starts to harden-maybe3-5 minutes? and wipe it off. I used some cheesecloth to "drag" the glaze. I varied the amount of pressure I applied for each up and down wipe until I had the look I wanted.


The hardware was quite yucky looking, but since I wasn't allowing myself to spend anything on this project, I just scrubbed them up a bit with some Bon Ami. And got a nice surprise:


I didn't scrub all the patina off, just some of it. Here's me being an uber-super dork:


Embarassing. Husband's sweater and maternity pants I refuse to get rid of because they are comfy.

Btw- I used Holloway House's window cleaner to get that the glass all sparkly. It's lavender mint scented and it doesn't dry out my hands the way a lot of window cleaners do.

Then, we needed to retro fit the hutch so that it would function as our bar.
I envisioned hanging our wine glasses and maybe even our champagne saucers in the glassed in top, so the husband made some simple slots from leftover wood.


So simple. You can see that each end piece is just 2 pieces of overlapping wood glued together and each of the inner pieces is 3 pieces glued together. We got the length by eyeballing it against the depth of the cupboard.


After gluing them together, we clamped them and left them overnight to dry.


Then, we affixed them to the original shelf, which I painted with leftover paint from our back splash.


Here it is:


Here's a close up of the glass holder my husband made:


The bottom is large enough to accommodate a wine bottle on its side, so I may put some stackable wine racks down there eventually. Pier 1 has some cool ones I kind of like, but we'll see. For the moment, it is housing our much-depleted-from-the-holidays liquor assortment.

We placed the bar at an angle in a very awkward corner in our dining area. I love it there! I thing it really finishes the space nicely. It was so nice getting all of the barware out of the kitchen cabinets. I have so much more space now- love it!


Oh and would you mind doing us a favor? The husband and I can't decide what to do with our bedroom floors. Specifically, do we want to install berber or hardwoods? We don't allow the pups in our bedroom, so ease of cleaning isn't really a concern. We love the look of both and need help choosing! If you wouldn't mind hitting up the poll on our homepage and voting, we'd be very grateful :)

Linking with:

Addicted2Decorating

Wednesday, January 25, 2012

Converting a China Hutch to a Home Bar

I've been toying with the idea of converting my grandmother's old china hutch into a home bar lately. It's had a pretty rough life and the antique value is basically nil, so I've kind of been thinking of using the leftovers from the Rustoleum Cabinet Transformations kit so that it coordinates with our kitchen. I was also thinking of giving it a cool decorative glaze to keep it from being too matchey. My end goal is for it to be 1. useful and 2. modern...ish. Some ideas I'm loving right now:

I really like the functionality of this one, as well as the Craftsman hardware:

Source: houzz.com via Anaika on Pinterest


And I definitely dig the layout of this Pottery Barn model:


The glaze technique on this one really appeals to me. And the sage is almost a match for our cabinets:


A couple of ideas for the inside:


We actually considered the faux tin sheeting for our back splash, but decided it would look too busy. It's about 20 bucks a sheet, so it might be an inexpensive way to really punch up our hutch. Or, I might go really cheap and just use wall paper:


Ok, it might be a little too orange for the look I'm after, but I do like the pattern.

I'm hoping to get the base color on by the end of today and possibly even glaze by tomorrow. Anyone converted one of these before? I'd love any advice you might have!

Monday, January 23, 2012

Rustoleum Cabinet Transformations-Kitchen Reno

Whew! The cabinets are the appropriate color, (almost) all the hardware is on, the vent hood is up, and with a bit of luck, our back splash may be up by the end of the day. Fingers crossed!

I also want to say that I am in no way being paid, compensated or anything else for this. These are my unvarnished (heehee) opinions of Rustoleum Cabinet Transformations and nothing else. You should be able to find the kit in the paint department of your local hardware store...it comes in 2 sizes and looks like this:


This kit is really and truly meant for cabinets that have previously been painted, stained, whatever. But, you can use it on unfinished wooden cabinets, which is what we did. These are the basic ingredients...you can make it a 3 step process or a 4 step process, depending upon the look you want.


The two main selling points for me are: no sanding and it's tintable to quite a few different colors. I've even heard that you can get it color matched to just about any color you want, too. We chose Meadow:


So, I set up a little "paint-booth" with the idea of keeping any stray dog hairs at bay and started deglossing. You'll know that your surface is properly deglossed when one of two things happen: painted/stained wood will look dull and bare wood will look a bit bleached, like this:


One small problem with deglossing bare wood, though. It raised up a bunch of splinters, so I wound up having to go back with a green scrub pad to get them off, then wipe them down with a lint free cloth. So, I probably could have used my little palm sander and been done sooner, but oh well.

Then, 2 coats of color. You're supposed to allow for 2 hours between each coat, but I cheated and it still came out fine. Not that I'm recommending you do that.


We tried out the decorative glaze on a scrap piece of wood and just didn't like the results. To me, it made the wood grain stand out a bit more and kind of gave the green a muddy appearance.


So, we just put the protective coat on and hung them up. Well, really, I put the protective coat on and my husband put on a second out of the whole fear of kids and dogs thing, but really, you only need one coat. Then, we installed the hardare, which we got from Home Depot in "contractor packs." I can't remember what we paid, but the knobs were about a buck each and the pulls were about a buck fifty each, so it was pretty economical.


And we got the vent hood up, too. So nice to have one again.


We're currently working on the back splash, then moving on to the floor. Stay tuned for the big reveal on January 31st!

In summary, though, I would absolutely recommend Rustoleum Cabinet Transformations. If you have any type of DIY experience, using the kit is a breeze. And if you don't, the instructions are so intuitive ans simple that it would still be pretty easy. My biggest gripe at the end of the day is that quite a bit of the wood grain still shows through on some of our upper cabinets. However, that is just me knit-picking. I'd like a little more opacity, but the cabinets really do look fantastic.

Oh, and if you'd like to read another review that I thought was spot-on, check out Centsational Girl's review here.

Friday, January 20, 2012

Imagine the Impossibilities Challenge-Kitchen Reno

I am going to attempt the impossible...and finish our kitchen reno by January 31. That means that in less than 2 weeks, the cabinets will be stained, hardware will be attached, a new floor will be laid, and a back splash will be up. GULP. But, I'm gonna do it. We've been snowed in for the past few days, which has given me a ton of time to work on it. I'm using Rustoleum Cabinet Transformations and am super pleased with the product thus far. I'll have the play-by-play for you soon, but in the mean time, here's the color we chose:


Anyway, I'm going to be linking up with these guys on January 31st to show off our new (hopefully 100% complete kitchen:


Join us and do let us know what you think!

In between staining the cabinets, the husband and I took the kiddos outside for a bit of snowy fun:


Let's just say that snow angels aren't her thing ;) Stay tuned for more on our fully stained (finally) kitchen cabinets!

Wednesday, January 18, 2012

How to Decorate a Mantel

EDIT: WOW, sorry about all that code where pictures were supposed to be. Darn you, Blogger!

Seriously, how do you decorate a mantel?! I was so freakin' excited when we bought this house and it had a big, old, fireplace and a super-sized mantel for me to decorate. Then, I figured out that I was actually going to have to decorate it. And that's when I figured out that I absolutely cannot put together a decent looking mantel to save my life. To add to my misery, one of my husband's biggest decorating pet peeves happens when I "over stuff" the mantel. Our mantel is pretty massive, so it's a challenge to keep it spare enough to keep him happy without making it look bare. And, I am also the least adept person at decorating a pretty mantel. Here's what I started with:


 Then, I layered in an old mirror that my Dad salvaged from a farmhouse that was scheduled to be torn down. He had it framed and gave it to us at our wedding. Then, an Italian swordsman that my mom picked up cheap at a garage sale. Moved the candles and subtracted the rattan basket.


And hated it. And got accused of "over stuffing." So now it's bare. And there is crap all over my living and dining room that I dug out of basement storage in a desperate bid to get this thing decorated. And I still hate my mantel.

After wasting a good three hours hoping that something might possibly look good up there, I gave up and just searched for mantel eye candy. Here you go:

I love how spare this one is:


Great eclectic mantle:

Kind of arty:

Simple and Tasteful:


Love how this one is layered:


Enjoy!