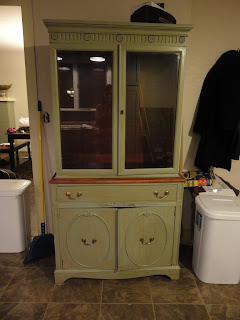
On Wednesday I shared with you some of my ideas and inspiration for converting my grandmother's old hutch to a bar. Well, I decided to go for it! Oh, and I didn't let myself spend any money on it, either. Here's what I started with...
Tons of potential, but a bit too formal for our Craftsman. We wanted something with more of a casual, farmhousey vibe. So, I pulled off the "gingerbread" on the glass doors. It had been cut from a super thin veneer, so it was a snap to just break it and pull it out. I probably wouldn't have the guts to do this with just any piece of furniture, but as I mentioned before, the condition made any "antique" value a moot point. Then, I used the same Meadow color we used on our kitchen cabinets (big reveal on the 31st!!!!!!)
I decided to leave the section in the middle alone for a bit of contrast, too. After 2 coats, this is what it looked like. It came out so much lighter than our cabinets did, which was weird, since I thought that painting over a darker wood color would make the paint appear darker, but hey, live and learn.
One part of the Rustoleum kit we hadn't used was the glaze. And since I'd never glazed anything before, I was itching to try it. It went on super dark and I definitely had that -uh oh, what have I done- moment:
You just paint the glaze on there with a brush, wait until it starts to harden-maybe3-5 minutes? and wipe it off. I used some cheesecloth to "drag" the glaze. I varied the amount of pressure I applied for each up and down wipe until I had the look I wanted.
The hardware was quite yucky looking, but since I wasn't allowing myself to spend anything on this project, I just scrubbed them up a bit with some Bon Ami. And got a nice surprise:
I didn't scrub all the patina off, just some of it. Here's me being an uber-super dork:
Embarassing. Husband's sweater and maternity pants I refuse to get rid of because they are comfy.
Btw- I used Holloway House's window cleaner to get that the glass all sparkly. It's lavender mint scented and it doesn't dry out my hands the way a lot of window cleaners do.
Then, we needed to retro fit the hutch so that it would function as our bar.
I envisioned hanging our wine glasses and maybe even our champagne saucers in the glassed in top, so the husband made some simple slots from leftover wood.
So simple. You can see that each end piece is just 2 pieces of overlapping wood glued together and each of the inner pieces is 3 pieces glued together. We got the length by eyeballing it against the depth of the cupboard.
After gluing them together, we clamped them and left them overnight to dry.
Then, we affixed them to the original shelf, which I painted with leftover paint from our back splash.
Here it is:
Here's a close up of the glass holder my husband made:
The bottom is large enough to accommodate a wine bottle on its side, so I may put some stackable wine racks down there eventually. Pier 1 has some cool ones I kind of like, but we'll see. For the moment, it is housing our much-depleted-from-the-holidays liquor assortment.
We placed the bar at an angle in a very awkward corner in our dining area. I love it there! I thing it really finishes the space nicely. It was so nice getting all of the barware out of the kitchen cabinets. I have so much more space now- love it!
Oh and would you mind doing us a favor? The husband and I can't decide what to do with our bedroom floors. Specifically, do we want to install berber or hardwoods? We don't allow the pups in our bedroom, so ease of cleaning isn't really a concern. We love the look of both and need help choosing! If you wouldn't mind hitting up the poll on our homepage and voting, we'd be very grateful :)
Linking with:
Addicted2Decorating


No comments:
Post a Comment