I changed a few things up on this page...really liking the chartreuse and grey. What do you think? Do you like the new look, or was the old one better?
Leave us comments below and let us know what you think, please!
Tuesday, June 7, 2011
Roman Tub
Originally, we only planned to take the light colored Pergo out of our bathroom, since it clashed with the hardwoods throughout the rest of the house. But, after ripping up the flooring, we discovered a rather inconvenient leak underneath the shower. Which meant ripping out the shower. I was pregnant with our daughter at the time, so husband figured that having a tub might be nice. He also figured if he finished it out really prettily, it would make a nice "push" present and give me a place to spend the first several hours of what would surely be a long first labor.
So, he drew out the shape, poured the concrete for the form, and framed it in:


Once the form was built, we slathered it in this stuff called Laticrete, which acts as an impervious membrane between the water and the concrete form. You can also use it to isolate cracks in anything that needs to be water tight, like a pool. It isn't the cheapest, but a little goes a long way and it really works.
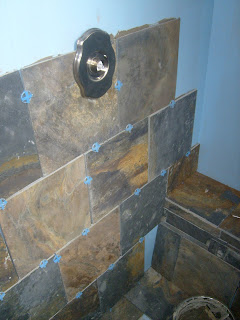
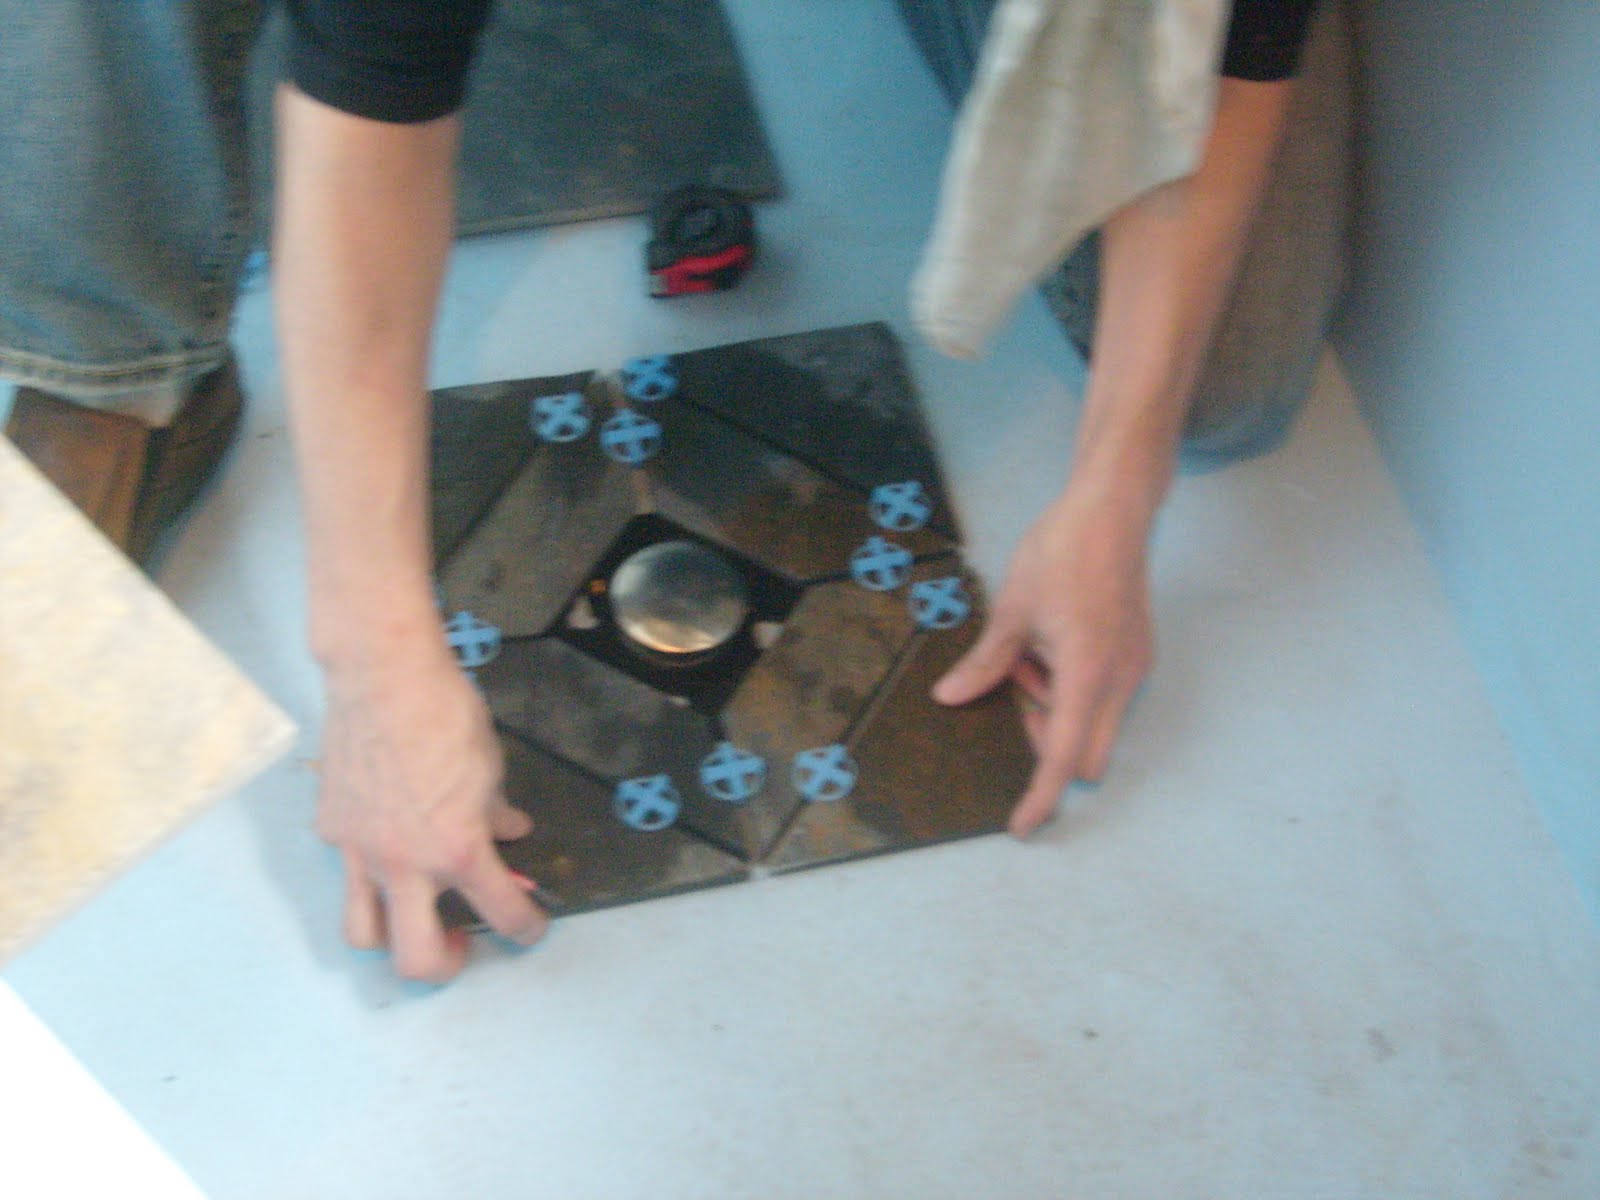
We used a "China Multi" slate that we specialty ordered from Flooring Connections in Anacortes.
 And Price Pfister fixtures that I got very, very lucky on cost-wise through Ebay:

We considered tiling the outside of the tub with the slate, but felt we needed to lighten the room up a bit, so we opted for beadboard and painted it bright white.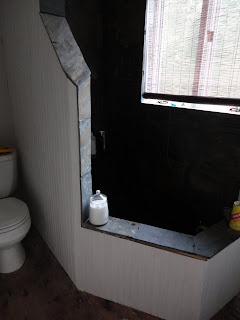
So, he drew out the shape, poured the concrete for the form, and framed it in:


I'm not sure how much the concrete weighed, but it was enough that we had to add extra supports to the floor. Remember the friend with the truck? He was with us through thick an thin on this project, too. I had pics of him building, but since he won't let me post anything that shows his posterior, you'll just have to use your imagination :) His wife also kept me company MANY a day when the boys were working on this.
Once the form was built, we slathered it in this stuff called Laticrete, which acts as an impervious membrane between the water and the concrete form. You can also use it to isolate cracks in anything that needs to be water tight, like a pool. It isn't the cheapest, but a little goes a long way and it really works.
We used a "China Multi" slate that we specialty ordered from Flooring Connections in Anacortes.
And a pop-up drain from Lowes- the only one they had:


That's the tub- complete with grout spacers, of course.
We considered tiling the outside of the tub with the slate, but felt we needed to lighten the room up a bit, so we opted for beadboard and painted it bright white.

Next up, hanging the mirrors above the vanity and staining the hardwoods. Once that's done, we'll put a thin piece of decorative molding where the floor and beadboard join.
Wednesday, June 1, 2011
DIY Double Sink Console
This is the vanity that came with the house. An Ikea special that was meant for a kid's bathroom, which worked great for me at 5'2", but was kind of a pain in the lumbar for the husband.

We'd talked about replacing it for a while, but debated whether we needed two sinks. I personally love bathroom vanities that look like furniture with sinks plopped on top. Like this one, which became the inspiration for our console:
But, I'm way too tight with a buck to shell out for one of them. Fortunately, they aren't that difficult (though they are time consuming) to make.
We started out with this old sideboard that I bought at a local thrift store for 45 bucks. The only issue was getting it home, since we drive a very small sedan. We actually wound up walking it home on a homemade furniture dolly, which was made more comical by the fact that we were brand spankin' new newlyweds and still trying to figure out how to work together. It was a very long 5 blocks, but fortunately our marriage survived.
The two deep cabinets on each side were perfect for housing the sink plumbing and that still left three generous sized drawers for toiletry and towel storage.
Then, we needed sinks. The cool pre-plumbed ones that look like weird bowls were kind of pricey (are you noticing a pattern here?) so we picked up these two porcelain pasta bowls at Target for 20 bucks each and husband drilled a drain hole in the bottom of each. That's what a sink is, right? A porcelain bowl? We decided to inset the bowls a bit, so that we wouldn't be stuck choosing a swan-neck type faucet.

The faucets we picked up at Home Depot for 68 dollars each. They're "Toomba" by Glacier Bay.
Here's the fun part: actually plumbing these things in. This is where having an enormously talented and very, very accomodating spouse comes in handy. This definitely was not a quick task, and I am eternally grateful that I married someone who has the know-how and guts to slice through sheetrock and sauter copper pipes.
Here's the result:


We'd talked about replacing it for a while, but debated whether we needed two sinks. I personally love bathroom vanities that look like furniture with sinks plopped on top. Like this one, which became the inspiration for our console:
 |
| photo credit; Pottery Barn |
We started out with this old sideboard that I bought at a local thrift store for 45 bucks. The only issue was getting it home, since we drive a very small sedan. We actually wound up walking it home on a homemade furniture dolly, which was made more comical by the fact that we were brand spankin' new newlyweds and still trying to figure out how to work together. It was a very long 5 blocks, but fortunately our marriage survived.
 |
| Awesome picture quality...sorry. |
The two deep cabinets on each side were perfect for housing the sink plumbing and that still left three generous sized drawers for toiletry and towel storage.
Then, we needed sinks. The cool pre-plumbed ones that look like weird bowls were kind of pricey (are you noticing a pattern here?) so we picked up these two porcelain pasta bowls at Target for 20 bucks each and husband drilled a drain hole in the bottom of each. That's what a sink is, right? A porcelain bowl? We decided to inset the bowls a bit, so that we wouldn't be stuck choosing a swan-neck type faucet.

Unfortunately, the suckers wouldn't fully drain. It turns out that a sink is a porcelain bowl that has been shaped to actually drain at the bottom. Duh. Back to Lowes. We found overmount Aquasource sinks that worked perfectly for about 40 bucks each.
 |
| This was the scary part-hacking up a perfectly good sideboard. |
 |
| photo credit: thehomedepot.com |
Here's the fun part: actually plumbing these things in. This is where having an enormously talented and very, very accomodating spouse comes in handy. This definitely was not a quick task, and I am eternally grateful that I married someone who has the know-how and guts to slice through sheetrock and sauter copper pipes.
Here's the result:

I am going to cry when we have to leave this behind.

So, the approximate cost of our double sink console, minus the "oops" with the original bowls:And here it is with a few finishing touches:

- sideboard $45
- Aquasource sinks $80
- faucets $136
- plumbing sundries about $100 (cheaper if your bathroom is already plumbed for 2 sinks)
- grand total:about $360 (much, much cheaper than buying one pre-made)
Tuesday, May 31, 2011
A Quick Update
Just got done turning an old sideboard into a double sink console...pics to come! I'm painting the bathroom today and we'll move it in there this evening when husband comes home from work.
Baby girl has her 1st birthday in 16 days AND she's trying to walk. Love watching her grow- hate how fast it's happening. We're having a joint birthday/father's day bbq to mark the occasion. For dessert, we're combing her two favorite things on earth; cupcakes and ice cream. Will definitely take pictures of the mess I know that's going to be!
And, hit 30 weeks pregnant with our 2nd today! Our munchkin should be weighing in at about 3 pounds right now. Getting so close. On a side note, the hormones are kicking my butt. I cried TWICE for no apparent reason yesterday and I do NOT cry. Or bleed when I get cut :)
Anyway, bathroom pics to come soon!
Thursday, May 26, 2011
Exterior Doors Cost How Much?!
Our 3 exterior doors needed varying degrees of help. The basement door we replaced- there were just too many dents in the steel. We considered replacing the back and front doors, as well, but that would have been ultra expensive. The cheapest door we found that we both thought looked decent was 300 bucks. The ones we actually liked ranged from between 500-1500. We looked at the local salvage yard; while we found some really great doors, salvage is "in" up here, so by the time we bought them and gave them a face lift, we wouldn't have saved any money. So, we decided to work with what we had.
Here's the inside of our front door. I slathered wood putty into all of its dents and dings:


Then sanded and taped:

And applied our trim color, Olympic Ebony, which is really more of a midnight blue, but I suppose it looks black if you squint at it long enough :)

Here's the inside of our front door. I slathered wood putty into all of its dents and dings:


Then sanded and taped:

And applied our trim color, Olympic Ebony, which is really more of a midnight blue, but I suppose it looks black if you squint at it long enough :)
 |
| Bad lighting, but you get the idea... |
And gave the other side the same treatment:

1 door saved and at least 300 bucks trimmed from our construction budget!
Tuesday, May 24, 2011
New Back Porch and Walkup: Completed
It's done! And we had just enough deck stain for the whole thing, which made my cheapskate self really happy.
Before:


Before:

And After:

Quite a few neighbors have come over to compliment it...with the exception of one who asked what we were thinking when we picked the stain color. :( I'm in love with it, though. It's so solidly built and it's going to look amazing with a little bit of lanscaping...
Saturday, May 21, 2011
New Walkup and Breakfast Area: Work in Progress
Due to city re- routing, our back door now serves as our primary entrance. The existing walkup was a bit of an after-thought; though serviceable, it didn't really make the kind of impression we wanted.
|
| Our walkup, complete with dirty dog beds. We decided to expand the footprint and create a small area for us to enjoy our morning coffee in, since we get great morning sun on this side of the house. So, out came the old staircase. We found quite a bit of rotten wood, so I guess it's lucky we decided to tackle it when we did.  The husband, with one of our many Porter Cable implements of destruction  The old staircase. Then came the platform and stairs:    I love it so far...it really is the perfect place to enjoy our morning coffee. I stained the cedar last night with the our Rosewood stain- we had about a half gallon left over from the fence. It actually looks like rosewood when it's applied to cedar. The railing is going up right at this moment. It would be done, but I asked husband to add more slats, so that it would be baby-proof. It's supposed to rain all day today and tomorrow, but as soon as I get the railing stained, I'll put the pics up. |
Subscribe to:
Posts (Atom)