Just "like" Benjamin Moore on Facebook and receive a free sample of paint! I'm going to get the husband to paint us some wall art with this sample and the free one I got from Glidden a while back.
Hurry, deadline is June 30th!
Tuesday, June 28, 2011
Tuesday, June 21, 2011
Our Mantel
I think it's safe to say that our mantel has come a very long way since the day we moved in:
One of the first things we did was remove the mirror. it added emphasis in all the wrong places. Then, since the original firebrick had been painted with a combo of white and red oil paint (aargh!) we painted over it with a flat sage-green color. Next, we unboarded the opening. Husband got some old ceiling tiles from the local salvage yard and cut them to fit the inside of the fireplace. Reddish-greeninsh slate tiles were installed on the hearth area. We're lucky enough to have a professional insert for our fireplace, but wood burning stoves are so expensive in this part of the country. So for now, we're foregoing one.

 |
| Before |
One of the first things we did was remove the mirror. it added emphasis in all the wrong places. Then, since the original firebrick had been painted with a combo of white and red oil paint (aargh!) we painted over it with a flat sage-green color. Next, we unboarded the opening. Husband got some old ceiling tiles from the local salvage yard and cut them to fit the inside of the fireplace. Reddish-greeninsh slate tiles were installed on the hearth area. We're lucky enough to have a professional insert for our fireplace, but wood burning stoves are so expensive in this part of the country. So for now, we're foregoing one.
 |
We added a painting my mom-in-law did...she's so talented. I've always loved this painting...I have a thing for Hereford cows, which this is. A mix-mash of candlesticks and the two stools that originally sat at the foot of our bed, and viola! It could be better, but it is such an improvement over what was there. And here's a closer-ish look at the painting:

We have an ultra-long mantel, so it's a challenge to get it adequately decorated without junking it up. I'm sure it'll change, but the cow is there to stay :)
Monday, June 20, 2011
Pretty Lighting, on the Cheap
We just scored what might possibly be the deal of the century. It meant braving Lowe's on a weekend, but it was worth it. We'd been using a paper lantern from the bachelorette pad with a lightbulb stuck in it (which is probably the ultimate in Lighting on the Cheap) over our dining table for a while. It was very college-apartment chic. We knew we wanted to replace it, but couldn't find anything we loved. And then we saw this:
It's a Kichler and was originally $124, which means there was no way we would have bought it. Not that it's a bad price for quality lighting, we're just that (insert one: cheap, frugal, tight with a buck.) We snapped it up for $20. How? We were lucky enough to happen upon it at Lowe's as they were changing out their display models. They had some awesome deals...we saw pretty sconces for as low as $4! To sweeten the deal, it came with all the CFL's that it needed for the 5 up-lights, and an ultra-expensive LED bulb in the down-light. All we had to do was clean the heck out of it- display models get dusty!
We got so lucky on this one. I've also found some amazing deals by stalking stores' weekly ads and the good fortune of being friends with people who work retail. I also think that holding out for something you love, at a price that you're comfortable with always pays off in the long-run. Even if it means pushing thirty and eating your mac-n-cheese under a paper light for a while :)
Oh, and I still love my paper lantern- we're going to hang it in our baby girl's room, where it'll be much more age-appropriate.
 |
| Kichler Chandelier |
We got so lucky on this one. I've also found some amazing deals by stalking stores' weekly ads and the good fortune of being friends with people who work retail. I also think that holding out for something you love, at a price that you're comfortable with always pays off in the long-run. Even if it means pushing thirty and eating your mac-n-cheese under a paper light for a while :)
Oh, and I still love my paper lantern- we're going to hang it in our baby girl's room, where it'll be much more age-appropriate.
Saturday, June 18, 2011
Potrack on a Whim
Our diy potrack was made entirely out of galvanized pipe and secured to the brick column in our kitchen with wall anchors. We spent about $60 on the pipes and the actual hooks were $1 each at Gretchen's.
 |
| Galzanized potrack |
Friday, June 17, 2011
Salvaging Our Old Wooden Doors
Full disclosure: This freakin' project has taken me more than 2 months! to complete, even with help from the husband. I've literally lost skin working on these damn things and I'm only 1 door into 2.
But... I'm really not big on putting hollow-core interior doors in an old house. They just look too new. However, we have these really old, solid wood interior doors that came with the house, so I feel like they deserve to be salvaged. Even if it kills me. Which it might. They were coated in 5 separate layers of paint, some latex, some oil. Actually, that was the easy side of the door; the reverse had no less than 8 distinct coats. So, we used this stuff on the advice of a nice man at Lowes:
You can actually use this stuff inside. It's safe enough that with proper protective equipment (goggles, gloves, mask) even pregnant people can use it! So, I brushed the stuff on, waited, and scraped a couple of layers of paint off with a dinky little plastic scraper.
Repeated. Repeated again, this time using a professional scraper with a razor blade on the business end. Attempted to use my Black and Decker Mouse Sander (the one that husband affectionately refers to as the "little woman sander") to get the rest of the crud off. Which worked about as well as just asking it politely to remove itself from my door. The next day, I was gifted with a DeWalt orbit sander, which I think means that he felt guilty for buying himself a new 18 volt lithium drill. Whatever. The orbit sander didn't get all of it, though. We wound up buying these Gator attachments for our old corded drill. They look like brillo pads on steroids and are labeled "for aggressive paint removal."
They got the remaining paint off, albeit very slowly, and they certainly weren't gentle on the wood. Then, I finally got smart and swiped the husband's belt sander. Ever used one of those? For a tiny chick, it's like walking a dog that outweighs you by 90 pounds, knowing full well that you are the one getting walked.
To recap, we used:
The whole sticky process with the Citristrip:


Bare. Freakin'. Wood!:

And the finished product, hung in our baby's room:
The original plan was to paint the door stark white to match our trim work, but no way was I going to go through all of this and paint over the woodgrain. So, we're matching it to the French doors with Minwax Bombay Mahogany in Satin. Between buying the Citristrip and the paint eaters, we didn't save money by salvaging. Hollow-cores are only 30 bucks. We may have saved money over buying solid wood interior doors, though I rather doubt it. And I still have one more to do...which makes me want a margarita, which I can't have until the little guy is done incubating. I'm honestly not in love with it...the stain didn't take even remotely closely to the way our french doors did. Was it worth it in the long run? Probably not. I'm going to have to think long and hard before I tackle the one in our bathroom, even though it is driving me batty. But, if you're curious as to what the salvage process looks like, consider yourself warned ;)
But... I'm really not big on putting hollow-core interior doors in an old house. They just look too new. However, we have these really old, solid wood interior doors that came with the house, so I feel like they deserve to be salvaged. Even if it kills me. Which it might. They were coated in 5 separate layers of paint, some latex, some oil. Actually, that was the easy side of the door; the reverse had no less than 8 distinct coats. So, we used this stuff on the advice of a nice man at Lowes:
 |
| thanks, home depot, for the pic |
You can actually use this stuff inside. It's safe enough that with proper protective equipment (goggles, gloves, mask) even pregnant people can use it! So, I brushed the stuff on, waited, and scraped a couple of layers of paint off with a dinky little plastic scraper.
Repeated. Repeated again, this time using a professional scraper with a razor blade on the business end. Attempted to use my Black and Decker Mouse Sander (the one that husband affectionately refers to as the "little woman sander") to get the rest of the crud off. Which worked about as well as just asking it politely to remove itself from my door. The next day, I was gifted with a DeWalt orbit sander, which I think means that he felt guilty for buying himself a new 18 volt lithium drill. Whatever. The orbit sander didn't get all of it, though. We wound up buying these Gator attachments for our old corded drill. They look like brillo pads on steroids and are labeled "for aggressive paint removal."
 |
| photo credit: the home depot |
They got the remaining paint off, albeit very slowly, and they certainly weren't gentle on the wood. Then, I finally got smart and swiped the husband's belt sander. Ever used one of those? For a tiny chick, it's like walking a dog that outweighs you by 90 pounds, knowing full well that you are the one getting walked.
To recap, we used:
- Citristrip (multiple coats)
- A plastic scraper
- A metal scraper
- A mouse sander, with no less than 3 different grits of sandpaper
- An orbit sander with 2 different grits of sandpaper
- A "paint eater" drill attachment
- A belt sander
 |
| Ok, so it doesn't look that bad, but really, the paint is dingy white and peeling. |


And the finished product, hung in our baby's room:
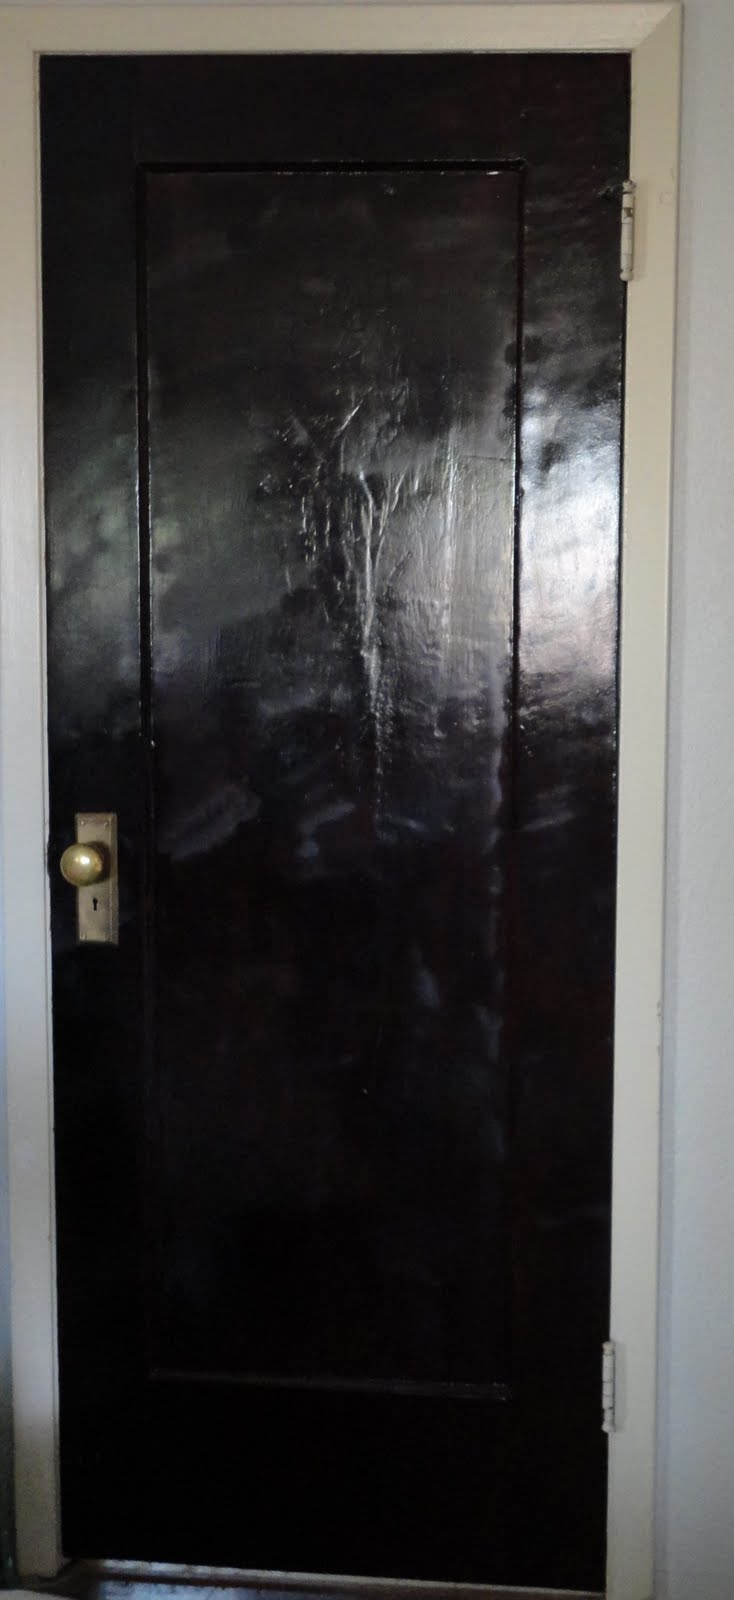 |
| Ugh. It's soo shiny. And you can see every little line the belt sander made. |
What We Did (And Did Not) Accomplish This Week:
We didn't make any more progress on the kitchen. We're still in Scandinavian Cabinet Land and will be until I get some energy.
Here's what did get done and what I'll be sharing later this week:
Here's what did get done and what I'll be sharing later this week:
- My door project: I'll be posting a detailed rant about this door, just in case anyone reading is ever
stupidbrave enough to think of doing this at home. I don't recommend it. This is one project that I'm filing away under "live and learn." - The lighting over the dining table. It's beautiful and we got it for a steal!
- A DIY pot rack that husband whipped up out of galvanized pipe.
- Our gorgeous bathroom, sooo close to done, we just need to put in baseboards, but I can't wait to show it off!
- And most importantly, baby girl's 1st birthday. It was a chocolately, cheese-pizza-filled blast and we aren't done celebrating yet :)
Monday, June 13, 2011
Gutting the Kitchen
We're a long way from done with our kitchen renovation, but it's a definite improvement!
Especially considering that this is what we started with:
Sorry the picture is so tiny. See the area to the right of the brick? That's gone. In it's place is our refrigerator, which had previously been taking up way too much room on a different wall.
We painted the area behind the fridge with our new paint color, but obviously, we still need to do the rest of the kitchen. This week's mammoth project will be refacing the cabinets and installing new countertops. We're on a tight schedule, too...this Saturday is our Baby's 1st Birthday/Father's Day BBQ Joint Celebration, so the kitchen HAS to be done! At some point, we'll rip up the linoleum and put in ceramic, too.
Here's where the fridge was:
And is now:
We also got a killer deal on a black gas range from Sears. I love this range! The white stove that came with the house was cranky like no other and had several different hot spots. We called it Vesuvius. Thanks to Craigslist, though, Vesuvius has gone to a new home.
We haven't decided if we'll stain the wood ourselves as we reface the cabinets or if we'll use Rustoleum's Cabinet Transformations kit, but I'll keep you posted as to our progress. If anyone's used the Cabinet Transformations, please let us know how it worked- did you love it or hate it?
Added bonus: rearranging and gutting the kitchen left room for my laptop to have a permanent home:
 My husband made the desk for me when we moved in. I couldn't find any small-scale desks I liked, so "I'll just make you one, and it'll be cheaper," he announced. This conveniently provided him the
 excuse reason he'd been looking for to purchase a table saw. But, I love it- it's lightweight enough that I can move it myself, too. And here's my reading light:
 He was a Ross find. Yes, I have a thing for dogs. :) Will keep the kitchen renovation updates coming this next week!
Especially considering that this is what we started with:
 |
| It's called "Scandinavian Style." I call it "Blech!" |
We painted the area behind the fridge with our new paint color, but obviously, we still need to do the rest of the kitchen. This week's mammoth project will be refacing the cabinets and installing new countertops. We're on a tight schedule, too...this Saturday is our Baby's 1st Birthday/Father's Day BBQ Joint Celebration, so the kitchen HAS to be done! At some point, we'll rip up the linoleum and put in ceramic, too.
Here's where the fridge was:
 |
| Like the mess?! The fridge was really in the way of the entry door. |
 |
The brick pillar is original to the house. Cool, huh? |
We haven't decided if we'll stain the wood ourselves as we reface the cabinets or if we'll use Rustoleum's Cabinet Transformations kit, but I'll keep you posted as to our progress. If anyone's used the Cabinet Transformations, please let us know how it worked- did you love it or hate it?
Added bonus: rearranging and gutting the kitchen left room for my laptop to have a permanent home:


Thursday, June 9, 2011
Closet Makeover
This is all the proof I need that my husband loves me and wants me to be happy...at least until the next round of pregnancy hormones hit. I used to have three closets at the Bachelorette Pad in Texas. Yes, they were all full. It was glorious. Then we moved to Mount Vernon and bought this really cool old house...maybe you've seen it? Like most old houses, the closets were an after-thought. We bought a small Closet Maid system from Lowe's to tide us over. I hung up the clothes I wore the most, then stuck everything else in Rubbermaid tubs and stacked them 3 high.
Awesome feat of organization, huh? But, no more. Super amazing, sweet, and freakin' talented husband has made over my our closet. We knew we needed more space, which mean demolishing a pretty good portion of the wall on either side of what was already there. This is all the crap (drywall, wood, etc.) that had to come out:

We wanted a built-in look, so he decided to use cabinet-grade plywood to construct it. By the way, we are HUGE Lowe's fans if you can't already tell, but if you need lumber, I highly recommend giving Home Depot a try. The plywood was exponentially cheaper there. Here's the assembled form:

Husband built it in our bedroom, then slid it into place. And by "slid," I mean that he used a very large hammer to convince it in there. There it is, slid all the way back into our recessed closet space.
Then, he made his own veneer to face the front with. Yup, you can buy veneer, but it's thin and crappy, so he just made it himself using leftover wood and a table saw. Awesome, huh?
Then I stained it with our Minwax Bombay Mahogany, which I went out and bought more of, just to realize that I already had an extra can sitting at home the whole time. Duh. But we wound up using part of the second one, so it was ok. And we'll probably have to buy more of it before this house is completed. Husband is seriously obsessed with the stuff- he says it's the perfect combination of Cherry and Espresso, which sounds pretty tasty right about now, but I'm also 8 months preggo and it's lunchtime, so you can just take that with a grain of salt.
We bought a plain old dowel rod and stained it to match, too. And Voila! Our gorgeous closet:
 Ok, so maybe those aren't all of our clothes. And we still have to border it with the trim pieces (we were going to put doors on it, but no way am I covering up my custom closet!) And the floor still needs refinishing, the bedroom walls need to be painted, and at some point we're going to have to put storage baskets in those cubbies or make something suitable. but, you get the idea.
Linking with:

And:

 |
| See the exposed wall on the left? That's where Remi, my 90 lb Valentines day present, chewed through the sheetrock. |
Awesome feat of organization, huh? But, no more. Super amazing, sweet, and freakin' talented husband has made over

We wanted a built-in look, so he decided to use cabinet-grade plywood to construct it. By the way, we are HUGE Lowe's fans if you can't already tell, but if you need lumber, I highly recommend giving Home Depot a try. The plywood was exponentially cheaper there. Here's the assembled form:
 |
| Sides, half of the back, and what will eventually be a cubby system. |
 |
| Upper cubbies for linen storage, lower for foldable clothing |

Husband built it in our bedroom, then slid it into place. And by "slid," I mean that he used a very large hammer to convince it in there. There it is, slid all the way back into our recessed closet space.
Then, he made his own veneer to face the front with. Yup, you can buy veneer, but it's thin and crappy, so he just made it himself using leftover wood and a table saw. Awesome, huh?
Then I stained it with our Minwax Bombay Mahogany, which I went out and bought more of, just to realize that I already had an extra can sitting at home the whole time. Duh. But we wound up using part of the second one, so it was ok. And we'll probably have to buy more of it before this house is completed. Husband is seriously obsessed with the stuff- he says it's the perfect combination of Cherry and Espresso, which sounds pretty tasty right about now, but I'm also 8 months preggo and it's lunchtime, so you can just take that with a grain of salt.
 |
| Coat 1 of 2 of stain |
We bought a plain old dowel rod and stained it to match, too. And Voila! Our gorgeous closet:

Linking with:
And:
Subscribe to:
Comments (Atom)