I think our son does a pretty good job of making it look good, but I can't really expect him to hang out in the living room all day ;)
Our curtains were pretty inexpensive to begin with and I figured they'd be the fastest, cheapest thing to change up. I found this 3 pack of Martha Stewart Living Stencils at Michael's for about 16 bucks. If I'd actually remembered the 40% off coupon that we'd gotten in the mail, they would have been a whole heck of a lot cheaper. Grr.
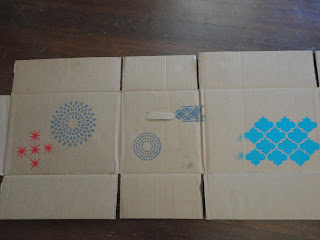
They have kind of a fun, 60's ish vibe that my husband really likes, so I figured it was a good place to start. We picked out a few of our favorite patterns and tested them out on a flattened diaper box.
As much as I liked the pattern in turquoise, I had some concerns about the scale looking a little wimpy on our curtains. I was also a little worried about how long it would take to completely fill up a panel, so we opted to go with the sort of floral/circular/ mum looking patterns. I knew from our test that I wanted the turquoise to be the predominant color, too. Actually, I would have gone with red had I been left to my own devices, but my husband loves all shades of blue and I take my brownie points where I can get them. I know it's kind of weird that I'm married to a dude who is into color, but he spent several years living in Battleship Grey barracks rooms, so when the man asks for color, he gets color.
I
The roller was soaking up more paint than it was depositing, so I eventually just switch to a regular old brush. In areas where I couldn't clamp the stencil to the fabric, I just weighted it down.
I didn't really have a plan for stenciling the patterns on... I started at the bottom and just worked my way up., though I did stencil the patterns on according to size, working largest to smallest.
Once I got the blue and red on, it occurred to me that the patterns kind of resembled a kaleidoscope, so I added the quad stars in. The effect is pretty fun and still allows for a lot of light to filter in. I think these may eventually wind up in the kids' room, but for now, I'm digging the pop of color they add.
For the facing window, I went with my dominant red, but kept the star grey so that each panel would tie in with the other. Why not, right?! Actually, these are my favorite, but I am a red-aholic so I guess it really isn't that shocking.
FYI- the acrylic paint was Artist Loft in Turquoise, Brilliant Red, and Grey all from Michael's.
Hope you like them! The weather is more of that patented Pacific NW "bright haze." Good pretty pictures aren't going to be happening today, unfortunately.
I did finally get a few decent evening shots. The sun had just started going down, which happens SUPER quick here, so I was running around flipping on lights, fluffing curtains, and chunking toys into their bins. As you can see, Ms. Toddler rescued her Cinnamon Bear.
Linking with Kristi at A2D!


Love the stencil you chose! I'm so anxious to try this myself. I bought some fabric paint the other day, and I'm going to give it a try.
ReplyDeleteI can't wait to see what you come up with, Kristi. Thank you for always being so kind and encouraging!
ReplyDeleteThe stenciled curtains are shown here. Have a look at it
ReplyDelete